Showing posts with label vmware. Show all posts

April 22, 2026

# The Solo Exodus: A One-Man Migration from VMWare to Hyper-V 2025

The Solo Exodus: A One-Man Migration from VMWare to Hyper-V 2025

Date: April 22, 2026
Author: “Me” and AI Generation by Gemini
Context: Enterprise Infrastructure Reprovisioning (Small University Environment, 2024–2026)


1. The Timeline: A Journey of Persistence

The “Solo Exodus” was not a rapid sprint, but a multi-year marathon of research, failure, and ultimate success.

  • Late 2024: Initial pre-testing and evaluation of hypervisor alternatives in isolated labs.
  • July 2025: Formal project commencement; deep-dive production testing of Hyper-V and Proxmox.
  • Late 2025: The “Horror Phase”; months of troubleshooting blade chassis networking and SAN connectivity.
  • February 2026: The “February Blitz”; migration of the University’s core ERP and database systems, following the successful transition of numerous production-level auxiliary and infrastructure services over the prior months.
  • April 2026: Final cleanup, legacy environment decommissioning, and transition to full modernized operations.

2. The Catalyst: The Broadcom “Shockwave”

In early 2025, the university’s virtualization strategy hit a wall. With the restructuring of legacy hypervisor licensing, what had once been a routine, predictable renewal process became an existential threat. Broadcom’s aggressive shift in licensing models was perceived locally as a blatant extortion tactic, designed to outprice all but the Fortune 500.

For a solo administrator at a small university, the implications were immediate and dire. A renewal that once fit within a standard operational budget had ballooned into a figure that threatened the department’s ability to maintain even basic services. The mandate was clear and non-negotiable: Total evacuation of the legacy environment by April 30th. This was more than a technical migration; it was a high-stakes race against a licensing expiration date that carried catastrophic financial penalties.

2. The Crucible of Choice: Evaluating the Alternatives

The migration wasn’t a blind jump; it was a calculated escape. The administrator conducted deep-dive evaluations of several “post-VMware” homes, re-testing both Hyper-V and Proxmox on production hardware after initial successes in isolated DR testing.

The Nutanix Wall

While Nutanix offered a powerful hyperconverged alternative, it presented a fatal flaw: its requirement for local storage. Adopting Nutanix would have meant abandoning the university’s significant existing investment in iSCSI SAN hardware. Combined with a “half-million dollar” price tag, Nutanix was fundamentally incompatible with the university’s fiscal and physical reality.

The OpenShift Experiment

Testing Red Hat OpenShift revealed a platform described as “over-complex and convoluted” for a solo shop. The administrative overhead of managing a container orchestration layer just to run traditional VMs was deemed excessive for a one-man team. Furthermore, concerns regarding storage driver compatibility for live migrations—a critical requirement for maintaining university uptime—effectively ended this path as a viable production hypervisor home.

The Proxmox Nightmare

Proxmox initially showed great promise in a DR site, but re-testing on the DR hardware turned into a cautionary tale. A simple SSD upgrade led to a broken cluster, revealing that the platform’s manual resource management and “touchy” configuration made it “potentially unrecoverable” in a solo-admin emergency. The risk of being the only person in the organization capable of fixing a platform that could fail so catastrophically during a routine hardware change was deemed an unacceptable risk to the university’s continuity.

The Winner: Windows Server 2025 CORE

The transition established a fully integrated, high-availability software stack that modernized the university’s virtual ecosystem:

  • Host & Compute: A minimal Windows Server 2025 Core footprint running the Hyper-V role.
  • Orchestration: Failover Clustering for seamless workload mobility and high availability.
  • Networking: A converged fabric using Switch Embedded Teaming (SET) with logically segregated VLANs for Management, Heartbeat, and Live Migration.
  • Storage Architecture: Resilient multi-path iSCSI (MPIO) delivering performance to the Dell SANs through Cluster Shared Volumes (CSV).

3. The Migration Engine: Veeam B&R v12

Veeam Backup & Replication v12 was the definitive saving grace of the entire migration. Its robust V2V (Virtual-to-Virtual) capabilities and instant recovery features provided the safety net required for a solo operation of this scale.

The migration was not a simple 1:1 move; it was a total environment lifecycle event. While 126 VMs comprise the final migrated fleet, the process involved the decommissioning of some obsolete legacy systems and the reprovisioning of some infrastructure and template VMs to meet the new standards of the Hyper-V 2025 environment. Without Veeam’s reliability and its ability to handle the “heavy lifting” of data conversion and repository management, the administrator faced a grim reality: outsourcing the project, forced retirement, or seeking new employment. Veeam didn’t just move data; it preserved the administrator’s sanity and the project’s viability.

4. The Engineering Engine: AI-Human Peer Collaboration

Behind the migration was a massive, high-intensity collaboration between the Human administrator and an A.I. peer. This partnership produced an entire Git project of scripts that transformed manual infrastructure into code.

This wasn’t just a collection of helper scripts; it was an entire ecosystem designed to turn a blank Server Core install into a cluster-ready node. While the legacy environment could often be provisioned in an hour or two, the Hyper-V 2025 “Solo Exodus” was a more deliberate, full-day process. From the initial Windows installation to the final cluster-join and configuration, every step was automated yet intensive, potentially requiring a full workday per node to ensure a production-ready state. The collaboration involved:

  • Iterative Design: Prompting and refining scripts through hundreds of cycles to handle the nuances of Windows Server 2025.
  • A 7-Phase Workflow: Developing a sequential process covering everything from bare-metal NIC renaming and Switch Embedded Teaming (SET) to complex iSCSI fabric orchestration and MPIO configuration.
  • Operational Autonomy: Creating 100+ VM operational workflows that allowed a single person to manage a massive fleet with the same efficiency as a much larger team.

5. The Scale of the Exodus: Environment Sizing

This project was a massive infrastructure reprovisioning across two geographically separated sites, involving both a comprehensive infrastructure refresh and a total hypervisor shift. While the server hardware had been updated in a previous 2023 cycle, the “Solo Exodus” was an entirely data-oriented and software-oriented overhaul of the university’s virtual ecosystem.

Compute Infrastructure

  • Production Cluster (On-Site): 5 x Dell PowerEdge R650 nodes with 512 GB RAM each, running Windows Server 2025 Core.
  • Disaster Recovery (DR) Cluster (Off-Site): 4 x Dell PowerEdge FC630 blade nodes with 384 GB RAM each.
  • Storage Shift: The only physical hardware change required was the installation of SSD OS disks for the DR hosts to replace the legacy SD cards used for VMware booting.
  • Capacity: Over 4 Terabytes of aggregate physical RAM across the clusters, providing the headroom for the final 126 production, testing, and template VMs.

Storage Infrastructure (iSCSI SAN)

  • Production (Dell PowerVault ME5084): 61.4 TB SSD / 526 TB 7K Spindles.
  • DR (Dell Compellent SC4020 + Expansions): 41 TB SSD / 196 TB 7K Spindles.
  • The ReFS “Size Tax” & Tiering: Standardizing on ReFS (Resilient File System) required a mandated 10-15% “size tax” buffer to ensure volume stability. This forced a strategic tiering model where mission-critical databases remained on SSD, while auxiliary systems were provisioned to 7K disks to manage the massive storage footprint.

6. The Technical Battleground: Storage & Networking

The migration’s “horror phase” centered on aging blade chassis hardware and the intricacies of the Windows iSCSI initiator. While Linux could ping iSCSI targets in minutes, Windows 2025 Core proved a stubborn adversary.

The 0.0.0.0 Binding Fix

The ultimate critical necessity for iSCSI/MPIO was the discovery that Windows defaults were binding iSCSI NICs to 0.0.0.0, essentially attempting to route storage traffic over the management network and breaking multipathing. Success was only achieved after hard-blocking these defaults through PowerShell and explicitly binding every session to the correct iSCSI NIC IPs.

The “Miracle” Firmware

DR hardware success was blocked for months by a refused release of firmware for the DR SAN hardware. The vendor claimed no updates were available that would resolve the VLAN tagging issues encountered on the blade chassis. The breakthrough occurred when the administrator discovered, by chance, that a firmware update had been released in the background without advertisement. Immediate installation solved the long-standing VLAN tagging issues, breathing new life into the DR site.

The VLAN Tangle

Tracing tagged ARP packets through the chassis IOMs using pktmon was a week-long battle against failing traffic, ultimately resolved by the “miracle” firmware discovery.

7. Modernized Resilience: Backup & Recovery

The migration necessitated a complete redesign and “surgical” reprovisioning of the entire backup infrastructure to support the new Hyper-V environment.

The Repository Reprovisioning Marathon

Rebuilding the Veeam backup infrastructure on the DR SAN was a high-stakes challenge due to the SAN’s near-total capacity saturation. The administrator couldn’t simply “wipe and start over.” Instead, the process involved days of meticulous data-moves paired with volume-level data UNMAPPING (TRIM/UNMAP) in small multi-terabyte chunks. This was a “surgical” operation to slowly reclaim space and reprovision the Veeam repositories without crashing the existing volumes.

Tiered Architecture & Cloud Strategy

  • Primary Backup Architecture: A 64 GB RAM Veeam Backup & Replication server (2023 refresh) managing a 28TB repository located in the same rack as the Production hosts.
  • Tiered Offsite Recovery: A 64 GB RAM offsite repo manages three distinct backup targets:
    • SSD Immutable Tier: 7-day immutable backups for rapid, secure recovery.
    • Long-Term Storage (LTS): 60-to-90 day retention for historical compliance.
    • VeeamZips: Specialized archival for legacy and point-in-time snapshots.
  • Scale-Out Strategy: Implementation of a Scale-Out Backup Repository (SOBR) targeting Backblaze.com for modern, cloud-native offsite protection.
  • Hardware Repurposing: The offsite tier was built by repurposing hardware from the pre-2023 production environment, transforming obsolete legacy assets into a functional recovery infrastructure.

8. The February Blitz: Moving the University’s Heart

The true test of the migration came in February 2026, when the administrator began moving the university’s entire Enterprise Resource Planning (ERP) ecosystem—the mission-critical systems that handle everything from student registration to financial records.

Within a two-week window, the following were successfully ported:

  • Production Databases: The primary Enterprise Resource Planning (ERP) and reporting backends.
  • Application Layers: The complete ERP application suite, including administrative portals, APIs, and student/staff self-service interfaces.
  • Critical Middleware: Single Sign-On (SSO) authentication services, document management systems, and enterprise file transfer protocols.

A mirror-image migration of the “EIS-TEST” stack was completed first to validate the V2V process, ensuring that the move of the production “heart” would be seamless.

9. Lessons Learned for the Solo Administrator

  1. Trust Automation, Not Defaults: Standard MPIO settings and iSCSI bindings failed where PowerShell-driven custom policies succeeded.
  2. Persistence through Failure: Success often lies just beyond the point where you want to quit; multiple failed attempts on production hardware were required to find the final technical breakthroughs.
  3. The Snapshot Trap: Unlike the old environment, Hyper-V’s silence on stale checkpoints can lead to silent performance degradation; monitoring must be a manual discipline.
  4. Capacity Planning is Key: The 10-15% ReFS capacity overhead is a critical planning factor. It forced a tiering shift where non-essential auxiliary systems were moved to 7K disks to preserve high-performance SSD space for the core ERP and database workloads.

10. Acknowledgements

This project, while a solo execution, was shaped by the insights and experiences of a broader community of professionals.

  • Peer Insights: Sincere thanks to my peers for the many conversations that helped refine the strategic directions, downtime coordination, and post-migration testing, as well as the successful reconfiguration of select replaced VMs.
  • External Guidance: A special note of gratitude to a fellow administrator from a partner university, whose early advice on the absolute necessity of Failover Clustering and the overall viability of the Hyper-V ecosystem provided the foundational confidence needed to commit to this path.
  • Family Support: My deepest gratitude to my family for their unwavering support and their incredible tolerance of the many self-induced stresses and headaches that accompanied this demanding technical odyssey.

Status: Legacy Environment Purge Complete. Success. 🚀 🙌 🥳


Produced via AI-Human Collaboration (Gemini)
# The Solo Exodus: A One-Man Migration from VMWare to Hyper-V 2025

The Solo Exodus: A One-Man Migration from VMWare to Hyper-V 2025

Date: April 22, 2026
Author: “Me” and AI Generation by Gemini
Context: Enterprise Infrastructure Reprovisioning (Small University Environment, 2024–2026)


1. The Timeline: A Journey of Persistence

The “Solo Exodus” was not a rapid sprint, but a multi-year marathon of research, failure, and ultimate success.

  • Late 2024: Initial pre-testing and evaluation of hypervisor alternatives in isolated labs.
  • July 2025: Formal project commencement; deep-dive production testing of Hyper-V and Proxmox.
  • Late 2025: The “Horror Phase”; months of troubleshooting blade chassis networking and SAN connectivity.
  • February 2026: The “February Blitz”; migration of the University’s core ERP and database systems, following the successful transition of numerous production-level auxiliary and infrastructure services over the prior months.
  • April 2026: Final cleanup, legacy environment decommissioning, and transition to full modernized operations.

2. The Catalyst: The Broadcom “Shockwave”

In early 2025, the university’s virtualization strategy hit a wall. With the restructuring of legacy hypervisor licensing, what had once been a routine, predictable renewal process became an existential threat. Broadcom’s aggressive shift in licensing models was perceived locally as a blatant extortion tactic, designed to outprice all but the Fortune 500.

For a solo administrator at a small university, the implications were immediate and dire. A renewal that once fit within a standard operational budget had ballooned into a figure that threatened the department’s ability to maintain even basic services. The mandate was clear and non-negotiable: Total evacuation of the legacy environment by April 30th. This was more than a technical migration; it was a high-stakes race against a licensing expiration date that carried catastrophic financial penalties.

2. The Crucible of Choice: Evaluating the Alternatives

The migration wasn’t a blind jump; it was a calculated escape. The administrator conducted deep-dive evaluations of several “post-VMware” homes, re-testing both Hyper-V and Proxmox on production hardware after initial successes in isolated DR testing.

The Nutanix Wall

While Nutanix offered a powerful hyperconverged alternative, it presented a fatal flaw: its requirement for local storage. Adopting Nutanix would have meant abandoning the university’s significant existing investment in iSCSI SAN hardware. Combined with a “half-million dollar” price tag, Nutanix was fundamentally incompatible with the university’s fiscal and physical reality.

The OpenShift Experiment

Testing Red Hat OpenShift revealed a platform described as “over-complex and convoluted” for a solo shop. The administrative overhead of managing a container orchestration layer just to run traditional VMs was deemed excessive for a one-man team. Furthermore, concerns regarding storage driver compatibility for live migrations—a critical requirement for maintaining university uptime—effectively ended this path as a viable production hypervisor home.

The Proxmox Nightmare

Proxmox initially showed great promise in a DR site, but re-testing on the DR hardware turned into a cautionary tale. A simple SSD upgrade led to a broken cluster, revealing that the platform’s manual resource management and “touchy” configuration made it “potentially unrecoverable” in a solo-admin emergency. The risk of being the only person in the organization capable of fixing a platform that could fail so catastrophically during a routine hardware change was deemed an unacceptable risk to the university’s continuity.

The Winner: Windows Server 2025 CORE

The transition established a fully integrated, high-availability software stack that modernized the university’s virtual ecosystem:

  • Host & Compute: A minimal Windows Server 2025 Core footprint running the Hyper-V role.
  • Orchestration: Failover Clustering for seamless workload mobility and high availability.
  • Networking: A converged fabric using Switch Embedded Teaming (SET) with logically segregated VLANs for Management, Heartbeat, and Live Migration.
  • Storage Architecture: Resilient multi-path iSCSI (MPIO) delivering performance to the Dell SANs through Cluster Shared Volumes (CSV).

3. The Migration Engine: Veeam B&R v12

Veeam Backup & Replication v12 was the definitive saving grace of the entire migration. Its robust V2V (Virtual-to-Virtual) capabilities and instant recovery features provided the safety net required for a solo operation of this scale.

The migration was not a simple 1:1 move; it was a total environment lifecycle event. While 126 VMs comprise the final migrated fleet, the process involved the decommissioning of some obsolete legacy systems and the reprovisioning of some infrastructure and template VMs to meet the new standards of the Hyper-V 2025 environment. Without Veeam’s reliability and its ability to handle the “heavy lifting” of data conversion and repository management, the administrator faced a grim reality: outsourcing the project, forced retirement, or seeking new employment. Veeam didn’t just move data; it preserved the administrator’s sanity and the project’s viability.

4. The Engineering Engine: AI-Human Peer Collaboration

Behind the migration was a massive, high-intensity collaboration between the Human administrator and an A.I. peer. This partnership produced an entire Git project of scripts that transformed manual infrastructure into code.

This wasn’t just a collection of helper scripts; it was an entire ecosystem designed to turn a blank Server Core install into a cluster-ready node. While the legacy environment could often be provisioned in an hour or two, the Hyper-V 2025 “Solo Exodus” was a more deliberate, full-day process. From the initial Windows installation to the final cluster-join and configuration, every step was automated yet intensive, potentially requiring a full workday per node to ensure a production-ready state. The collaboration involved:

  • Iterative Design: Prompting and refining scripts through hundreds of cycles to handle the nuances of Windows Server 2025.
  • A 7-Phase Workflow: Developing a sequential process covering everything from bare-metal NIC renaming and Switch Embedded Teaming (SET) to complex iSCSI fabric orchestration and MPIO configuration.
  • Operational Autonomy: Creating 100+ VM operational workflows that allowed a single person to manage a massive fleet with the same efficiency as a much larger team.

5. The Scale of the Exodus: Environment Sizing

This project was a massive infrastructure reprovisioning across two geographically separated sites, involving both a comprehensive infrastructure refresh and a total hypervisor shift. While the server hardware had been updated in a previous 2023 cycle, the “Solo Exodus” was an entirely data-oriented and software-oriented overhaul of the university’s virtual ecosystem.

Compute Infrastructure

  • Production Cluster (On-Site): 5 x Dell PowerEdge R650 nodes with 512 GB RAM each, running Windows Server 2025 Core.
  • Disaster Recovery (DR) Cluster (Off-Site): 4 x Dell PowerEdge FC630 blade nodes with 384 GB RAM each.
  • Storage Shift: The only physical hardware change required was the installation of SSD OS disks for the DR hosts to replace the legacy SD cards used for VMware booting.
  • Capacity: Over 4 Terabytes of aggregate physical RAM across the clusters, providing the headroom for the final 126 production, testing, and template VMs.

Storage Infrastructure (iSCSI SAN)

  • Production (Dell PowerVault ME5084): 61.4 TB SSD / 526 TB 7K Spindles.
  • DR (Dell Compellent SC4020 + Expansions): 41 TB SSD / 196 TB 7K Spindles.
  • The ReFS “Size Tax” & Tiering: Standardizing on ReFS (Resilient File System) required a mandated 10-15% “size tax” buffer to ensure volume stability. This forced a strategic tiering model where mission-critical databases remained on SSD, while auxiliary systems were provisioned to 7K disks to manage the massive storage footprint.

6. The Technical Battleground: Storage & Networking

The migration’s “horror phase” centered on aging blade chassis hardware and the intricacies of the Windows iSCSI initiator. While Linux could ping iSCSI targets in minutes, Windows 2025 Core proved a stubborn adversary.

The 0.0.0.0 Binding Fix

The ultimate critical necessity for iSCSI/MPIO was the discovery that Windows defaults were binding iSCSI NICs to 0.0.0.0, essentially attempting to route storage traffic over the management network and breaking multipathing. Success was only achieved after hard-blocking these defaults through PowerShell and explicitly binding every session to the correct iSCSI NIC IPs.

The “Miracle” Firmware

DR hardware success was blocked for months by a refused release of firmware for the DR SAN hardware. The vendor claimed no updates were available that would resolve the VLAN tagging issues encountered on the blade chassis. The breakthrough occurred when the administrator discovered, by chance, that a firmware update had been released in the background without advertisement. Immediate installation solved the long-standing VLAN tagging issues, breathing new life into the DR site.

The VLAN Tangle

Tracing tagged ARP packets through the chassis IOMs using pktmon was a week-long battle against failing traffic, ultimately resolved by the “miracle” firmware discovery.

7. Modernized Resilience: Backup & Recovery

The migration necessitated a complete redesign and “surgical” reprovisioning of the entire backup infrastructure to support the new Hyper-V environment.

The Repository Reprovisioning Marathon

Rebuilding the Veeam backup infrastructure on the DR SAN was a high-stakes challenge due to the SAN’s near-total capacity saturation. The administrator couldn’t simply “wipe and start over.” Instead, the process involved days of meticulous data-moves paired with volume-level data UNMAPPING (TRIM/UNMAP) in small multi-terabyte chunks. This was a “surgical” operation to slowly reclaim space and reprovision the Veeam repositories without crashing the existing volumes.

Tiered Architecture & Cloud Strategy

  • Primary Backup Architecture: A 64 GB RAM Veeam Backup & Replication server (2023 refresh) managing a 28TB repository located in the same rack as the Production hosts.
  • Tiered Offsite Recovery: A 64 GB RAM offsite repo manages three distinct backup targets:
    • SSD Immutable Tier: 7-day immutable backups for rapid, secure recovery.
    • Long-Term Storage (LTS): 60-to-90 day retention for historical compliance.
    • VeeamZips: Specialized archival for legacy and point-in-time snapshots.
  • Scale-Out Strategy: Implementation of a Scale-Out Backup Repository (SOBR) targeting Backblaze.com for modern, cloud-native offsite protection.
  • Hardware Repurposing: The offsite tier was built by repurposing hardware from the pre-2023 production environment, transforming obsolete legacy assets into a functional recovery infrastructure.

8. The February Blitz: Moving the University’s Heart

The true test of the migration came in February 2026, when the administrator began moving the university’s entire Enterprise Resource Planning (ERP) ecosystem—the mission-critical systems that handle everything from student registration to financial records.

Within a two-week window, the following were successfully ported:

  • Production Databases: The primary Enterprise Resource Planning (ERP) and reporting backends.
  • Application Layers: The complete ERP application suite, including administrative portals, APIs, and student/staff self-service interfaces.
  • Critical Middleware: Single Sign-On (SSO) authentication services, document management systems, and enterprise file transfer protocols.

A mirror-image migration of the “EIS-TEST” stack was completed first to validate the V2V process, ensuring that the move of the production “heart” would be seamless.

9. Lessons Learned for the Solo Administrator

  1. Trust Automation, Not Defaults: Standard MPIO settings and iSCSI bindings failed where PowerShell-driven custom policies succeeded.
  2. Persistence through Failure: Success often lies just beyond the point where you want to quit; multiple failed attempts on production hardware were required to find the final technical breakthroughs.
  3. The Snapshot Trap: Unlike the old environment, Hyper-V’s silence on stale checkpoints can lead to silent performance degradation; monitoring must be a manual discipline.
  4. Capacity Planning is Key: The 10-15% ReFS capacity overhead is a critical planning factor. It forced a tiering shift where non-essential auxiliary systems were moved to 7K disks to preserve high-performance SSD space for the core ERP and database workloads.

10. Acknowledgements

This project, while a solo execution, was shaped by the insights and experiences of a broader community of professionals.

  • Peer Insights: Sincere thanks to my peers for the many conversations that helped refine the strategic directions, downtime coordination, and post-migration testing, as well as the successful reconfiguration of select replaced VMs.
  • External Guidance: A special note of gratitude to a fellow administrator from a partner university, whose early advice on the absolute necessity of Failover Clustering and the overall viability of the Hyper-V ecosystem provided the foundational confidence needed to commit to this path.
  • Family Support: My deepest gratitude to my family for their unwavering support and their incredible tolerance of the many self-induced stresses and headaches that accompanied this demanding technical odyssey.

Status: Legacy Environment Purge Complete. Success. 🚀 🙌 🥳


Produced via AI-Human Collaboration (Gemini)

January 26, 2022

Basic VmWare DataStore Stats

Get Basic VMWare DataStore Statistics via PowerShell PowerCLI

Big thanks to LucD, and this post which is essentially the entire solution: https://communities.vmware.com/t5/VMware-PowerCLI-Discussions/PowerCLI-script-to-get-DatastoreCluster-Datastores-and-the-size/td-p/1301104

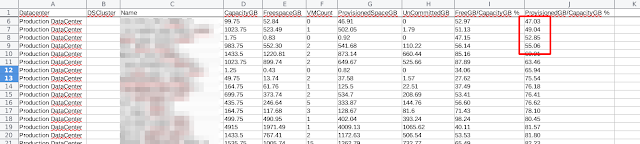
Problem: I need stats on datastores. Specifically, i need to find which DataStores are over-provisioned compared to the VM’s assigned to it.

Solution:

The script will output to .CSV file sorted by ProvisionedGB/CapacityGB percentage.

As such, you may see which datastore are heavily over-provisioned (in the sense of datastore larger than necessary).
Of course, you may also sort my other columns as needed.


Please consider crypto tipping:
  

February 11, 2021

Disable TLS 1.0 and 1.1 on ESXi 6.5, et. al. (Enable TLS 1.2)

Problem:

TLS Version 1.0 and 1.1 Protocol Detection (Nessus Plugins #104743 and #157288) on ESXi hosts.


Solution:

To mitigate this, we disable TLS 1.0 and 1.1 on our cluster(s) via SSH shell on our VCSA as well as SSH shell on the ESXi host(s). We ultimately put ESXi hosts into Maintenance mode and reboot. Please see the detailed step below. if for some reason you do not use clusters, then please reference the sources i’v elisted below and be sure to correct the command-line path location whcih has changed in 6.5+; otherwise the commands should work.

Sources:

I’ve used the following resources to enable SSH as well as disable TLS. I am not the originator, and the resources may be slightly stale, but still a very good reference froom which i solved my issues.

Steps:

  1. Enable SSH and BASH on VCSA (vCenter Server Appliance)


  2. Disable TLS 1.0 in vCenter. Use the reconfigureESX command to enable only TLS 1.1 and TLS 1.2.
    (alternatively, only TLS 1.2, if inclined to do so.)

    a) ssh into your vCenter and launch the bash shell


  3. b) Execute the command: (note to remove the 1.1 if inclined)
    /usr/lib/vmware-TlsReconfigurator/EsxTlsReconfigurator/reconfigureEsx vCenterCluster -c 'MY-CLUSTER' -u 'ADMIN-USER' -p TLSv1.1 TLSv1.2` , where the cluster is your cluster name and your administrative user is your privileged AD (Active Directory) account or administrator@vsphere.local account.

  • For security reasons, revert SSH and BASH to disabled state on vCenter.


  • Enable SSH on ESXi hosts and per sources listed above.

  • Disable TLS 1.0 and TLS1.1 on ESXi host(s) via SSH shell: (alternatively only TLS1.0, edit appropriately)
    a) backup existing watchdog config: cp -p /etc/sfcb/sfcb.cfg /etc/sfcb/sfcb.bak
    b) stop watchdog: /etc/init.d/sfcbd-watchdog stop
    c) disable protocols and set ciphers in sfcb.cfg with new settings:

  • echo -e "enableSSLv3: false" >> /etc/sfcb/sfcb.cfg
    echo -e "enableTLSv1: false" >> /etc/sfcb/sfcb.cfg
    echo -e "enableTLSv1_1: false" >> /etc/sfcb/sfcb.cfg
    echo -e "enableTLSv1_2: true" >> /etc/sfcb/sfcb.cfg
    echo -e "sslCipherList:ECDHE-RSA-AES256-GCM-SHA384:HIGH:!AECDH-AES256-SHA:!AECDH-DES-CBC3-SHA:!AECDH-AES128-SHA:!AES128-SHA:!AES128-SHA256:!AES128-GCM-SHA256:!AES256-SHA:!AES256-SHA256:!AES256-GCM-SHA384:!AECDH-AES256-SHA:!CAMELLIA128-SHA:!CAMELLIA256-SHA" >> /etc/sfcb/sfcb.cfg

    d) start watchdog: /etc/init.d/sfcbd-watchdog start

    e) backup existing httppproxy config: cp -p /etc/vmware/rhttpproxy/config.xml /etc/vmware/rhttpproxy/config.bak

    f) set ciphers with: sed -i '/following node to disable SSL -->/a\ <cipherList>ECDHE-RSA-AES256-GCM-SHA384:!aNULL:!AES128-SHA:!AES128-SHA256:!AES128-GCM-SHA256:!AES256-SHA:!AES256-SHA256:!AES256-GCM-SHA384<\/cipherList>' /etc/vmware/rhttpproxy/config.xml

    g) restart httpproxy: /etc/init.d/rhttpproxy restart


  • For security reasons, disable SSH again for each ESXi host as per sources listed above.

  • For Each ESXi host, but only one at a time, enter maintenance-mode, then reboot.


  • Re-running Nessus scans should now produce clean results for TLS 1.0 (and alternatively TLS 1.1).

    ~~~
    good luck!


  • Please consider crypto tipping:
      

    January 29, 2020

    PowerCLI enable CBT

    PowerCLI enable CBT on VM’s where CBT is disabled


    Problem: Some VM’s have CBT disabled.

    Warning: Maybe CBT should not be enabled in your environment. There are pre-requisites and if unpatched hosts, potential bugs with CBT. Please be diligent in researching CBT (Change Block Tracking) first.

    Solution: (note: bypasses any VM's with existing snapshots)


    ~~~
    As always, good luck.
    Please consider crypto tipping:
      

    November 06, 2019

    List VMWare VM's with attached ISO's

    Problem: I need to find all VM’s with ISO’s attached to the virtual CD-Roms.

    Prerequisite: VMWare PowerCLI for PowerShell

    Solution:

    $vCenter = "YOURVCENTERHOSTNAME"
    Import-Module VMware.VimAutomation.Core | Out-Null
    Connect-VIServer -Server $vCenter | Out-Null
    
    #The actual working code to list attached ISO's
    Get-VM | Get-CDDrive | Where-Object { $_.IsoPath -ne $null } | Select-Object Parent, IsoPath | Format-Table -auto
    
    Disconnect-VIServer * -Confirm:$false -Force -ErrorAction SilentlyContinue
    

    Good Luck!!!

    & Thank you to Adil Arif & Brian Graf : http://www.enterprisedaddy.com/2016/04/powercli-find-iso-attached-virtual-machines/


    Please consider crypto tipping:
      

    October 30, 2019

    Veeam PowerShell Enable Encryption on All Jobs

    Scenario: Your Veeam Backups have not been set for Storage Encryption. You have a ton of Backup Jobs and Backup Copy Jobs. You have exactly one (1) Encryption Password created.

    !!NOTICE!! Once you add even a single encryption password, please re-configure your Veeam “Configuration Backup” because adding a password is known to disable the Config backups!!!

    Problem: Manually editing each and every jobs is tedious and time consuming, and possibly prone to error.

    Solution Prerequisite: Veeam PowerShell API installed.

    Solution: Veeam PowerShell Enable Encryption on all the jobs at once:

    Add-PSSnapin VeeamPSSnapIn
    Disconnect-VBRServer #disconnect any prior
    Connect-VBRServer -server YOURVEEAMSERVER #[-user] -[password|credential] [-port 9392]
    
    $encryptionkey = Get-VBREncryptionKey -Description "YOURENCRYPTIONPASSWORDHINT"
    
    $jobs = ( Get-VBRJob | Sort-Object -Property Name ) #sort is not necessity 
    $jobs | Set-VBRJobAdvancedStorageOptions -EnableEncryption $true -EncryptionKey $encryptionkey
    

    Good Luck!


    Please consider crypto tipping:
      

    April 05, 2018

    Installing PowerCLI 10 in Debian 9

    Installing PowerCLI 10 in Debian 9
     

    The PowerCLI compatibility matrix states PowerShell 6.0.1 is supported. 6.0.2 and 6.1.0-Preview is not. (reference)

    Firstly, install PowerShell [almost] as per documentation: (reference) or (reference)
    sudo apt remove --purge powershell
    sudo apt install libc6 libgcc1 libgssapi-krb5-2 liblttng-ust0 libstdc++6 libcurl3 libunwind8 libuuid1 zlib1g libssl1.0.2 libicu57 libssl1.0.0 libssl1.0.2 libssl1.1 libicu52 libicu57 curl gnupg apt-transport-https
    curl https://packages.microsoft.com/keys/microsoft.asc | sudo apt-key add -
    sudo sh -c 'echo "deb [arch=amd64] https://packages.microsoft.com/repos/microsoft-debian-stretch-prod stretch main" > /etc/apt/sources.list.d/microsoft.list'
    sudo apt update
    sudo apt install -y powershell=6.0.1-1.debian.9
    sudo apt-mark hold powershell        #Pin this version... 'unhold' for non-recommended versions
    pwsh
    

    If you get a Segmentation fault you must sudo apt remove --purge libssl1.0.0!

    Install PowerCLI inside PowerShell: (reference)
    Install-Module -Name VMware.PowerCLI -Scope CurrentUser
    Set-PowerCLIConfiguration -InvalidCertificateAction Ignore   #Accept self-signed certificates
    
    You may later update with
    Update-Module VMware.PowerCLI
    Update-Help
    

    If you want a scope of AllUsers, then you will have to install with sudo pwsh and perform subsequent update with sudo pwsh as well.

    ~~~
    Good Luck!
    Please consider crypto tipping:
      

    January 29, 2018

    trojan:powershell/peasecto.A powercli false positive vmware powercli


    Problem:
    Trojan:Powershell/Peasecto.A - VMWare PowerCLI False Positive

    Available Resources:
    1) https://blogs.vmware.com/PowerCLI/2018/01/windows-defender-reports-false-positive-powershell-modules.html
    2) http://vmpro.at/windows-defender-reports-false-positive-for-powershell-modules/
    3) https://social.technet.microsoft.com/Forums/en-US/40fa56dd-b73f-456a-9d97-cdb4500bc7ed/latest-updates-indicated-peasectoa-infection-?forum=WindowsDefenderATPPreview

    This is what i did:
    1) DISABLED WINDOWS DEFENDER REALTIME and CLOUD
    2) Find-Module "VMWare.*" | Install-Module -AllowClobber -Verbose -Scope AllUsers -Force
    3) Find-Module "VMWare.*" | Update-Module -Verbose -Confirm:$false

    See https://steronius.blogspot.com/2017/04/vmware-powercli-651-now-easily.html for my original PowerCLI install post.

    ~~~
    As always, good luck!


    Coolest nerd tech ever:

     http://amzn.to/2BFbtM5


    December 20, 2017

    The host returns esxupdate error code:99


    ESXi 6.x + Dell

    The host returns esxupdate error code:99. An unhandled exception was encountered. Check the Update Manager log files and esxupdate log files for more details.


    TL;DR

        ssh root@host
            esxcli software vib remove --vibname=OpenManage


    Long version here: https://lonesysadmin.net/2016/05/27/esxupdate-error-code-99/
    Thank you Bob


    ~~~


    April 26, 2017

    VMWare PowerCLI 6.5 now easily installed via PowerShellGet

    PowerCLI


    EDIT 2023: please see https://williamlam.com/2022/11/how-to-install-powercli-13-0-and-use-new-image-builder-auto-deploy-cmdlets-on-apple-silicon.html and https://www.virten.net/2022/12/how-to-install-powercli-13-with-python-3-7-on-windows-required-for-imagebuilder/ for extra help regarding python 3.7 dependency.

    ~~~~ OP ~~~~:

    VMWare PowerCLI 6.5.x++ now easily installed via PowerShellGet! https://www.powershellgallery.com/packages/VMware.PowerCLI/

    PS> Install-Module -Name VMware.PowerCLI -Confirm:$false -Scope AllUsers -AllowClobber -Force

    That’s it! …However, You may also need to update occasionally:

    PS> Find-Module "VMWare.*" | Update-Module -Verbose

    Your scripts may begin with Import-Module VMware.VimAutomation.Core


    See the vmware blog for more info, including installing under an administrator account for an “AllUsers” install (Very helpful for multi-user workstations): https://blogs.vmware.com/PowerCLI/2017/04/powercli-install-process-powershell-gallery.html i.e. [...] -Scope AllUsers

    Separately, you may update all your powershell help files with Update-Help


    If you wish to purge PowerCLI, do so with the following from a standard Powershell (not PowerCLI):

    PS> (Get-Module VMware.PowerCLI -ListAvailable).RequiredModules | Uninstall-Module -Force
    PS> Get-Module VMware.PowerCLI -ListAvailable | Uninstall-Module -Force


    ~~~
    As Always, Good Luck!
      

    April 21, 2016

    VMWare HP VIB repo "vibsdepot.hp.com" changed to "vibsdepot.hpe.com"

    Have you used "vibsdepot.hp.com" as a VMWare Update Manager VIB Repository?

    You may now be getting the error:
    Cannot download software packages from patch source. Check the events and the Update Manager log for download details.

    If so, edit the repo URL. Reference: https://vibsdepot.hp.com/SDR/repo/vibsdepot/

    Quote:
    Notices

    New domain name: With the launch of the new company, Hewlett Packard Enterprise, please refer to this host as: "vibsdepot.hpe.com."   If you access this system using VMware Update Manager, VMware Image Builder or VMware vSphereCLI, please update your repository configuration files accordingly.

    Please consider crypto tipping:
      

    August 24, 2013

    Diskfree Watcher script for Linux (Walkthough)

    Problem: VMWare does not report Guest OS freespace, and as such there are no alarms triggered and emailed.

    Solution: For Linux, script hourly "df" testing within the OS.

    We will script the use of “df” to watch disk free space and perform sendmail if the usage is greater-than or equal-to a specified percentage.


    Prerequisite: “df”, “sendmail”, “grep”, “awk”, “cut” -- please install them if not installed.
    Prerequisite: You will need a valid mail-relay target or mail server target.

    Assuming root account.


    note: You will alter the script for your specific “df” output.
    note: Your drive device will have to be determined manually.
    note: “sendmail” my be in some other path than “/usr/sbin”
    note: This was all performed on CentOS, a RedHat clone.  Other distributions may be slightly different.


    Let’s first run the “df -h” command (diskfree -human_readable)


    In my case, this is:
    df -h
    Filesystem            Size  Used Avail Use% Mounted on
    /dev/mapper/vg_netflow-lv_root
                          90G   64G   22G  75% /
    tmpfs                 939M     0  939M   0% /dev/shm
    /dev/sda1             485M  115M  346M  25% /boot
    /dev/mapper/vg_netflow-lv_home
                         4.9G  160M  4.5G   4% /home


    So I have a choice, I can use “df” against any of the listed file-systems. Each one has a Mount point (alias)


    I’m interested in my root drive, so I’ll choose “df -h /dev/mapper/vg_netflow-lv_root”.  I could have as easily chose “df -h /” which would be the same in this case.
    df -h /dev/mapper/vg_netflow-lv_root
    Filesystem            Size  Used Avail Use% Mounted on
    /dev/mapper/vg_netflow-lv_root
                          90G   64G   22G  75% /


    Now what I’m interested in is the Use% (75% here).  I can “grep” for “% /” so that only that specific line is printed.
    df -h /dev/mapper/vg_netflow-lv_root | grep "\% \/"
    produces
                          90G   64G   22G  75% /


    Now I’m still only interested in the 75%, which is the 4th item.  Let’s “awk” that.
    df -h /dev/mapper/vg_netflow-lv_root | grep "\% \/" | awk '{ print $4 }'
    75%


    Now I only see 75%.  But I can’t ‘If-Then’ a number containing the %-sign, so I’ll “cut” it.
    df -h /dev/mapper/vg_netflow-lv_root | grep "\% \/" | awk '{ print $4 }' | cut -d% -f1
    75


    This is the result I want to perform an action on -- so now a script can be written.  Here is mine:
    cat /root/scripts/diskwatch.sh
    #!/bin/sh
    used=`df -h /dev/mapper/vg_netflow-lv_root | grep "\% \/" | awk '{ print $4 }' | cut -d% -f1`
    echo "diskspace used: $used%";
    if [ $used -ge 93 ] ;
    then
    /usr/sbin/sendmail "myaccount@mydomain.com" << EOF
    From: root@netflow.mydomain.com
    To: me@mydomain.com
    Subject: Alert: netflow diskspace $used% used.
    netflow diskspace $used% used.
    EOF
    fi


    This script prints the usage to screen and also sends mail if the usage if greater-than_or_equal-to 93%.


    Note the “used”-variable assignment -- The command is single-back-quoted.  The ` character on the ~ (tilde) key.
    Change the trigger-limit (93 here) as you see fit. And also, all your email information as it pertains to you and your server.  Make sure to mark your script executable, in my case
    chmod +x /root/scripts/diskwatch.sh


    You will need to configure your OS for sendmail.  As, stated above, you will need a valid email server or relay target.  This write-up does not go into such.


    Now configure sendmail, In my case, I used postfix sendmail, so I added
    relayhost = mail.mydomain.com
    to the file “/etc/postfix/main.cf” then restarted the postfix service
    service postfix restart


    You should test sendmail by typing the part of the script between “then” and “fi” directly in the command-line.


    If it works, you are ready to cron-job the script.
    crontab -e
    add
    0 * * * * /root/scripts/diskwatch.sh
    for hourly execution.

    Good Luck!
    -----------------
    Please consider crypto tipping:
      

    January 11, 2013

    Install official VMWare-Tools via yum repository for RedHat and CentOS


    Edit: RHEL 7 and CentOS 7 now officially recommends open-vm-tools via their own repository -- i.e. sudo yum -y open-vm-tools , then reboot -- that is all!  If you are still using RHEL/CentOS 5 or 6, then continue below:
    ~~~~~~~~~~~~~~~~~~~~~~~~~~~~~~~~~~~~~~~~~~~~~~~~~~~~~~~~~~~~~~~

    (Sources: http://packages.vmware.com/tools/docs/manuals/index.html)

    All instructions assuming root or sudo.

    Special Note: May have to remove old versions prior to upgrades:
    vmware-uninstall-tools.pl  or
    rpm -e VmwareTools or
    yum remove vmware-tools[-esx] or ..?..


    First, add gpg keys for repositories:
    wget http://packages.vmware.com/tools/keys/VMWARE-PACKAGING-GPG-DSA-KEY.pub
    wget http://packages.vmware.com/tools/keys/VMWARE-PACKAGING-GPG-RSA-KEY.pub
    rpm --import ./VMWARE-PACKAGING-GPG-RSA-KEY.pub
    rpm --import ./VMWARE-PACKAGING-GPG-DSA-KEY.pub


    Adding the appropriate sources depend on Release-Version and Architecture:

    (Tools version can be 4.0latest, 4.1latest, 5.0latest, or 5.1latest)
    (Release can be rhel5 or rhel6)
    (Architecture can be i386 or x86_64)

    ***** edit: Thanks to Anonymous (Nov 1 2013), please do not use "*latest" as VMWare now recommends the static url/folder.  Ex: "5.1u3". Find yours by traversing http://packages.vmware.com/tools/esx/ 
    ***** edit: As of Early 2014, I find "*.latest" is still working with ESXi 5.1 and CentoOS 6.5 -- proceed at your own discretion.

    Confirm your distro with cat /etc/redhat-release

    Confirm your architecture with uname -m (or -a) (if i686, use i386)

    Create the repository file /etc/yum.repos.d/vmware-tools.repo and edit it to contain the following, based on the above confirmations and desired vmware version:
    (your baseurl will be http://
    packages.vmware.com/tools/esx/<version>/<release>/<architecture>)
    (note various examples are commented with #)
    ----------------------------------------------------------------------------------------------
    [vmware-tools]
    name=VMware Tools

    baseurl=http://packages.vmware.com/tools/esx/5.1latest/rhel6/x86_64
    #baseurl=http://packages.vmware.com/tools/esx/5.1latest/rhel6/i386
    #baseurl=http://packages.vmware.com/tools/esx/5.1latest/rhel5/i386
    #baseurl=http://packages.vmware.com/tools/esx/5.1latest/rhel5/x86_64
    #baseurl=http://packages.vmware.com/tools/esx/4.0latest/rhel6/x86_64
    #baseurl=http://packages.vmware.com/tools/esx/4.0latest/rhel5/i686
    #baseurl=http://packages.vmware.com/tools/esx/4.0latest/rhel6/i686
    enabled=1
    gpgcheck=1

    ----------------------------------------------------------------------------------------------
     

    Installation for VMWare 4.x tools (option 1 or 2 exclusively):
    option 1) 4.x including X11 dependencies:
    yum install vmware-tools
    option 2) 4.x excluding X11 dependencies (headless):

    yum install vmware-tools-nox

    Installation for VMWare 5.x tools:
    Step 1) Confirm PAE or not (if not PAE, will not see it):
    uname -a


    Step 2) Install kmods: (option 1 or 2 exclusively)
    Option 1) non-pae:
    yum install vmware-tools-esx-kmods
    Option 2) pae:
    yum install vmware-tools-esx-kmods-PAE

    Step3) Install tools: (option 1 or 2 exclusively)
    Option 1) including X11 dependencies:
    yum install vmware-tools-esx
    Option 2) excluding X11 dependencies (headless):
    yum install vmware-tools-esx-nox

    Note, This can be done in one line, but "kmods" must be FIRST
    yum install vmware-tools-esx-kmods[-kerneltype] vmware-tools-esx[-nox]
    where [-kerneltype] is "-PAE" or nothing and "-nox" or not.

    Therefore, this is the no pae, no X (headless) install command:
    yum install vmware-tools-esx-kmods vmware-tools-esx-nox

    ~~~
    As always, good luck!


    Please consider crypto tipping:
      
    -------------